Grow Bags vs Pots for Veggies: The Choice That Makes or Breaks Your First Garden
You have your list of dream veggies, a sunny corner picked out, and ten different YouTube videos open. One says “Only use grow bags.” Another swears proper plastic pots are the only way to get real harvests. You scroll a shopping site and freeze: fabric bags, nursery pots, ceramic planters, buckets. You just want tomatoes, not an engineering degree.
Container choice feels small until it isn’t. Get it wrong and your soil dries out in hours, your plants cook on the balcony, or your tomatoes never really take off. Get it right and you’ll be picking salad bowls of greens and handfuls of cherry tomatoes from a tiny space with much less stress.
This guide strips it down to what you actually need to decide: grow bags vs pots, for your first vegetable garden, in your space, with your habits.
Start with your reality, not the product label
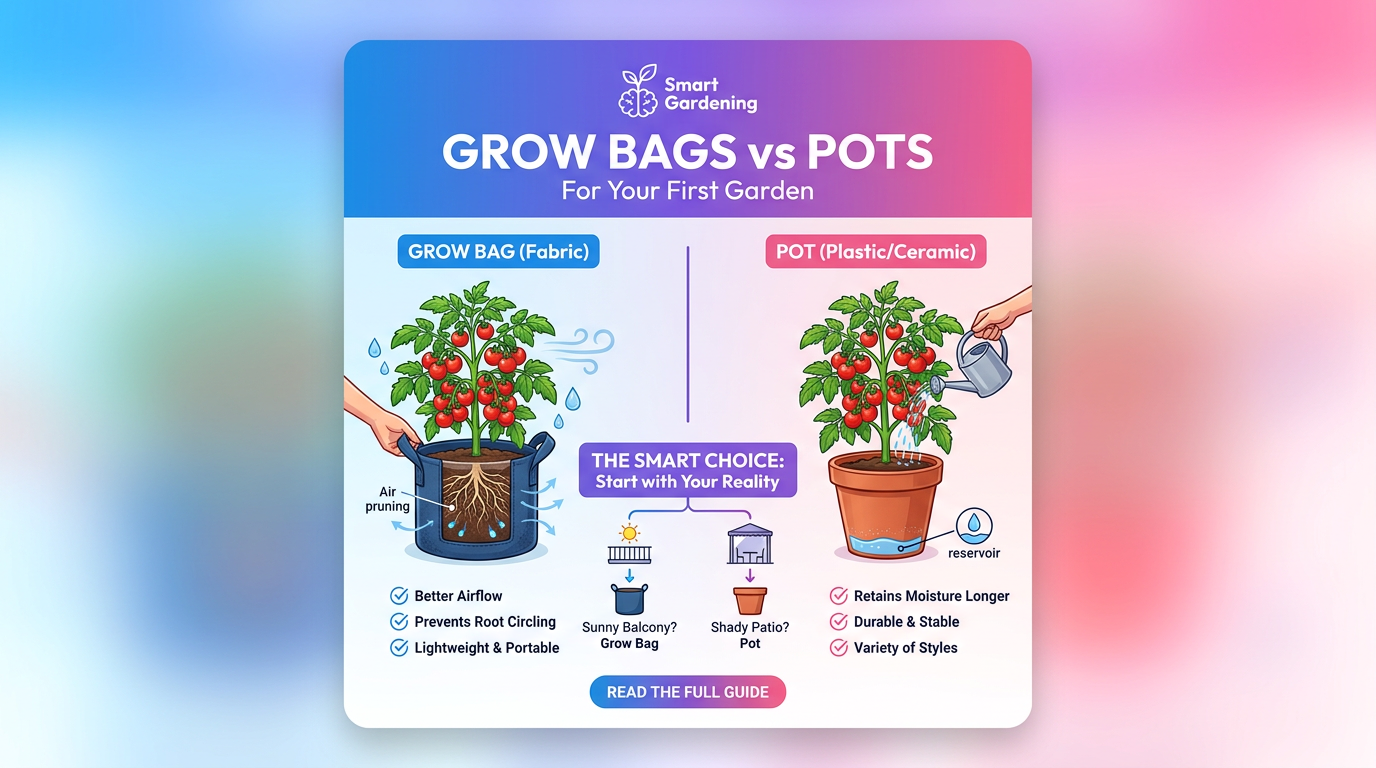
Before comparing grow bags and pots, anchor the decision in how you’ll really garden this season.
Ask yourself, and answer honestly:
-
Where will these containers live?
- Sunny balcony that heats up like an oven?
- Shady patio with cool tiles?
- Bare rooftop, open to sun and wind?
- A small yard you might rearrange later?
-
How often will you actually water?
- Once a day is realistic?
- Only mornings or only evenings?
- Some days you’ll definitely forget?
-
What are your top 3 crops this year?
- “Salad all the time” (lettuce, spinach, herbs)?
- “Tomato and chilli, always”?
- “Roots” (carrots, radish, beetroot)?
- “Big plants” (brinjal/eggplant, capsicum, beans)?
-
Do you need to move things often?
- Shift pots to chase the sun?
- Move everything when you host guests?
- Carry containers up and down stairs?
-
How much storage do you have off‑season?
- A shelf in a cupboard?
- A corner in the parking?
- Almost nothing?
Keep those answers in mind as you read. They matter more than any “best container” advice you’ll see online.
What grow bags actually do better than pots
Fabric grow bags look flimsy compared to solid pots, but they solve several beginner problems at once.
1. Fewer roots circling and choking your plants
In a standard plastic pot, roots hit the hard wall, turn, and circle around and around. That “root‑bound” mess can:
- Stunt growth
- Reduce flowering and fruiting
- Make watering unpredictable (water runs straight down the sides)
Grow bags are porous. When roots reach the fabric and meet air and light, the tips dry slightly. The plant responds by branching new feeder roots further back. This “air pruning” leads to:
- Denser, healthier root systems
- Better nutrient uptake
- More tolerant plants in heat and mild stress
For beginners, that means your plants are a bit more forgiving if you miss a perfect watering schedule or don’t fertilize exactly on time.
2. Stay cooler on hot balconies and roofs
On a 38–40°C day, a black plastic pot in full sun can get hot enough at the edges to cook roots. Fabric bags:
- Breathe from all sides
- Allow heat to escape
- Don’t store heat as ruthlessly as thick plastic or ceramic
If your space is:
- South‑ or west‑facing
- On tile or concrete
- Windy and exposed
…grow bags give your plants a real survival edge.
3. Better drainage out of the box
Grow bags are almost impossible to waterlog if you use a decent potting mix. Excess water:
- Runs out through the bottom
- Wicks through the sides
That drastically lowers the risk of beginner‑killer problems like root rot and fungus in containers without drainage holes or saucers that stay full.
4. Easier to store and scale
When the season ends or you want to pause gardening:
- Empty, shake off, fold the bag
- Stack 10–15 bags in the space of one big pot
This matters if you’re in an apartment or share storage space.
5. Often cheaper per liter of soil
In many markets, a 30–40 liter fabric grow bag costs less than a similar‑size decorative pot and about the same as a sturdy nursery pot. When you’re starting from zero, that helps you:
- Get enough volume for tomatoes, brinjal, okra, etc.
- Spend on good potting mix instead of just containers
Where traditional pots quietly win
Pots are not “old tech” to throw away. For certain situations and people, they still beat grow bags.
1. They dry out much more slowly
Solid pots (especially thick plastic or glazed ceramic):
- Lose water only from the top surface and drainage holes
- Shield soil from wind on all sides
That means:
- Fewer watering sessions
- More buffer if you skip a day
If you:
- Travel on weekends
- Know you’ll forget some evenings
- Don’t have a helper to water
…pots reduce your risk of coming home to wilted plants.
2. Easier to move once full
A 30‑liter grow bag filled with moist soil is heavy and floppy.
A 30‑liter plastic pot with handles or a rim is:
- Easier to grip
- Less likely to deform when lifted
- Safer to slide on the floor or on a trolley
If you shift containers:
- To chase the sun
- To clear space for guests
- To protect from storms
…pots are kinder on your back and less messy.
3. Cleaner and more “finished” looking
Grow bags can:
- Stain
- Sag a bit over time
- Grow a light algae film on the outside where they stay damp
If your balcony is also your living room view, you might prefer:
- Two or three clean, solid pots in a row
- Matching colors and heights
You can still grow a lot of food in a few well‑placed pots if that’s your priority.
4. Better for long‑term perennials
If you plan to keep:
- Lemongrass
- Curry leaf
- Small citrus
- Perennial herbs
…in the same container for several years, a sturdy pot:
- Handles UV exposure better
- Holds shape under root pressure
- Often outlasts most low‑cost grow bags
You can use thick, high‑quality grow bags long‑term, but budget bags may sag and degrade faster under constant sun.
Matching crops to containers: who likes what
Both options can grow almost anything, but some combinations make your life easier.
Crops that usually do best in grow bags
Pick grow bags first for:
- Tomatoes (especially indeterminate vines)
- Need deep, airy root space and excellent drainage
- Prefer 30–45 liter grow bags
- Brinjal/eggplant and capsicum/peppers
- Thrive in 20–30 liter bags
- Benefit from cooler roots in summer
- Potatoes
- Classic grow bag crop, easy to harvest
- 30–40 liter bags; roll the sides as plants grow
- Bush beans and peas
- Love well‑aerated roots
- 15–25 liters; can add stakes or a small trellis
- Cucumbers and bottle gourds (with vertical support)
- 30+ liters, lots of water but hate sitting soggy
For tall, thirsty plants on a hot balcony, grow bags give enough drainage and root health to keep them producing.
Crops that are often easier in pots
Pots work very well for:
- Leafy greens (spinach, lettuce, methi, amaranth)
- Shallow roots, harvest often style
- 10–15 liter pots or wide bowls
- Slower drying means less panic on hot days
- Herbs (coriander, mint, chives, oregano, thyme)
- Like consistent moisture
- Many spread; pots contain them neatly
- Root veg like carrots, beetroot, radish
- Need depth and steady moisture
- 20–25 cm deep pots with a light mix
- Perennial herbs and shrubs
- Rosemary, lemongrass, curry leaf in solid pots look tidy
You can grow all of these in grow bags; you just need to be more consistent with watering.
How to pick sizes that actually work
A big mistake beginners make: buying too many small containers. Both for grow bags and pots, volume matters more than fancy features.
Use this rough guide per plant:
- 10–12 liter (about 25–28 cm wide)
- Leafy greens (cut‑and‑come‑again style)
- Small herb mixes
- 15–20 liter (about 30–35 cm wide)
- Compact bush tomatoes
- Capsicum/chilli (one per container)
- Bush beans
- Larger herb clumps (mint, basil)
- 25–30 liter (about 35–40 cm wide)
- Full‑size tomatoes (one per container)
- Brinjal/eggplant
- Cucumber (one plant with vertical support)
- Potatoes
- 35–45 liter
- Big indeterminate tomatoes
- Large gourds, if you must grow them in containers
When in doubt, go bigger and grow fewer plants. One healthy tomato in a 30‑liter container will outproduce three struggling plants in cramped 10‑liter pots.
Watering reality: which one fits how you live?
Container gardening lives or dies on watering. Here’s how grow bags and pots behave day to day, so you know what you’re signing up for.
How grow bags behave with water
- Drain fast and evenly
- Sides wick moisture and then dry in wind and sun
- Top and edges dry faster than the center
In practice, that means:
- On a mild, cloudy day: once‑a‑day watering is usually enough.
- On a hot, windy day: large bags might need a deep morning watering and a quick evening check.
Grow bags are ideal if you:
- Enjoy daily garden time
- Already step onto your balcony morning and evening
- Want to avoid waterlogging at all costs
They’re risky if you:
- Frequently skip days
- Rely on rain (which may not reach under eaves or balconies)
How pots behave with water
- Keep moisture longer
- Outer soil doesn’t dry as fast
- Bottom can stay moist even when top looks dry
In practice:
- On moderate days: watering every 1–2 days may be enough.
- On hot days: once daily deep watering often works.
Pots are ideal if you:
- Can’t commit to twice‑a‑day checks in summer
- Have a helper to water but want to keep instructions simple: “Once every evening, soak until water runs out the bottom.”
Simple upgrades for both
Whichever you choose, a few low‑effort tweaks make watering easier:
- Mulch the surface
- Add 2–3 cm of dry leaves, straw, coco husk chips, or shredded newspaper on top.
- Cuts evaporation dramatically, especially in grow bags.
- Group containers by thirst
- Tomatoes, cucumbers, gourds together.
- Herbs and greens together.
- Saves you from over‑ or under‑watering mixed needs.
- Use a watering can with a rose head
- Gentle shower prevents soil from splashing out of grow bags.
Space, weight, and mess: apartment realities
Balcony and rooftop growers often discover the downside of certain containers only after the first season. Avoid that.
Weight on floors and balconies
Both grow bags and pots get heavy once filled. But the structure matters:
- Pots concentrate weight on smaller contact points (edges or feet).
- Grow bags spread weight more evenly, especially if you place them on trays or boards.
If you’re worried about load on tiles or an older structure:
- Use several medium‑size containers instead of one giant one.
- Distribute them along walls instead of clustering in the middle.
Protecting floors and dealing with runoff
Grow bags:
- Can stain pale tiles as water seeps through sides.
- May leak soil particles initially if your mix is very fine.
Pots:
- Leak mostly from bottom holes.
- Often sit in saucers that you need to empty.
Simple fixes:
- Place both grow bags and pots on:
- Plastic trays
- Old tiles, bricks, or wooden pallets
- Cheap doormats or coir mats
- Raise containers 1–2 cm to allow drainage without trapping water.
Visual order vs jungle effect
Grow bags make it easy to add “just one more plant,” which can quickly look messy. Pots tend to enforce limits.
If you want lush but tidy:
- Put grow bags in a simple wooden or metal rack.
- Use one color of bags (black or green) for visual calm.
- Line up larger containers in a straight row and keep smaller ones grouped in trays.
Cost, lifespan, and what to buy first
You don’t need to choose one forever. But you do need a smart starter set.
Typical lifespan
Rough expectations (varies by sun exposure and quality):
- Cheap fabric grow bags
- 2–3 seasons before seams weaken or fabric thins
- Thicker, UV‑treated grow bags
- 4–6 seasons if not dragged on rough surfaces
- Nursery‑grade plastic pots
- 5+ years; eventually get brittle in strong sun
- Ceramic / decorative pots
- Very long, but heavy and fragile
Where your money matters most
For a beginner veggie garden:
- Spend more on:
- Good potting mix and compost
- A few larger containers (20–30 liters)
- A watering can and a simple hand trowel
- Spend less on:
- Fancy self‑watering gimmicks
- Small decorative pots you can’t grow real food in
If budget is tight:
- Start with 3–5 larger grow bags for main crops.
- Add a few inexpensive plastic pots for herbs and greens.
That mix gives you both productivity and a buffer against missed waterings.
Quick decision guide: which should YOU start with?
Use this as a “choose your own container” checklist.
Scenario A: Hot, sunny balcony, daily access
- South or west exposure
- You step outside morning and evening
- You want tomatoes, chillies, beans
Start with:
- Mostly grow bags
- Sizes: 20–30 liters for fruiting crops
- Add 2–3 plastic pots (10–15 liters) for herbs and greens
Why: roots stay cooler and healthier, and you’re around to water.
Scenario B: Busy schedule, forgetful waterer
- You’re out long hours
- Some days you barely see the balcony
- You still want fresh herbs and a few veggies
Start with:
- Sturdy plastic pots for most plants
- Sizes: 15–20 liters for capsicum/tomato, 10–12 liters for herbs and greens
- If you really want a grow bag, use one or two for tomatoes only and mulch heavily
Why: pots buy you time if you skip a day.
Scenario C: Rooftop or very exposed terrace
- Open to strong sun and wind
- Floor heats up by noon
- Water access is okay
Start with:
- Grow bags on boards, pallets, or thick mats
- Bigger is better: 25–35 liters for tomatoes, brinjal, cucumbers
- Some deeper plastic pots for root crops
Why: you need maximum drainage and root cooling.
Scenario D: Very limited storage and rental home
- You may need to move soon
- No locker or shed
- You still want a “real” garden for a season
Start with:
- Fabric grow bags only
- Fold and carry them when you move
Why: light, packable, and cheaper to leave behind than ceramic.
Simple setups you can copy (no overthinking needed)
If you just want a ready‑made starting plan based on your priorities, pick one of these.
Setup 1: Salad and herbs for two people
Space: small balcony or patio
Use mostly pots.
- 3 × 12–15 liter pots for mixed leafies (spinach, lettuce, methi)
- 2 × 10–12 liter pots for basil and coriander
- 1 × 15–20 liter pot or grow bag for cherry tomato
Result: steady greens for salads and sabzis, plus cherry tomatoes for snacking.
Setup 2: Tomato and chilli lover’s starter kit
Space: balcony with at least 4–5 hours of sun
Use mostly grow bags.
- 3 × 25–30 liter grow bags for:
- 1 tall tomato
- 1 brinjal or capsicum
- 1 cucumber or bush beans
- 3 × 10–12 liter pots or 15 liter bags for:
- 2 chillies (one each)
- 1 basil or mint
Result: fruits for sambar, curry, chutney, and a bit of salad.
Setup 3: Low‑maintenance weekend gardener
Space: small patio, someone can water 3–4 times a week
Use more pots than grow bags.
- 4 × 15–20 liter plastic pots:
- 1 compact tomato
- 1 capsicum
- 2 pots with regular sowings of leafy greens
- 2 × 10–12 liter pots for mint and coriander
Mulch everything and water deeply when you can; ask your helper to soak each pot until water runs out the bottom.
How to avoid the most common beginner mistakes
Whichever container you choose, these pitfalls hurt more than the bag‑vs‑pot decision itself.
Mistake 1: Using garden soil or heavy topsoil alone
In any container:
- Garden soil compacts
- Drains poorly
- Cracks when dry
Use a light potting mix instead. A basic recipe per container:
- 40% cocopeat or coir
- 40% well‑finished compost
- 20% coarse material (perlite, sand, or small coco chips)
This one change does more for plant health than any fancy container choice.
Mistake 2: Too many plants in one container
Crowding:
- Creates competition for water and nutrients
- Increases disease risk
Simple rule:
- 1 tomato, brinjal, or capsicum per 25–30 liter container
- 4–6 leafy plants per 12–15 liter container (cut‑and‑come‑again)
- A handful of herbs per 10–12 liter container
Mistake 3: No drainage under containers
Standing water under pots or bags:
- Encourages mosquitoes
- Leads to root rot
Always provide:
- Saucers that you empty
- Bricks or stands under pots
- A slight tilt on the balcony floor so water can run off
Mistake 4: Chasing perfection before you start
You don’t need the “ideal” setup to learn. You need:
- A few adequate containers
- Reasonable potting mix
- A simple watering routine
You’ll learn more from one season with three mis‑matched containers than from months of reading and not planting.
You don’t have to marry grow bags or pots. You’re choosing partners for this season.
Pick containers that fit your space, your schedule, and the handful of crops you’re most excited about. Start with a small, clear setup, watch how the soil behaves in sun and shade, then adjust.
Next season, you’ll know from your own experience whether you want more grow bags for tomatoes, or more pots for herbs and greens. That’s how a thrown‑together first balcony garden quietly becomes the productive, beautiful food corner you had in your head all along.